

The Slideshow section allows you to showcase multiple slides in a large, visual presentation area. Each slide can be configured with its own content, images, and links, while the section settings control the overall appearance, layout, navigation, and automatic playback.
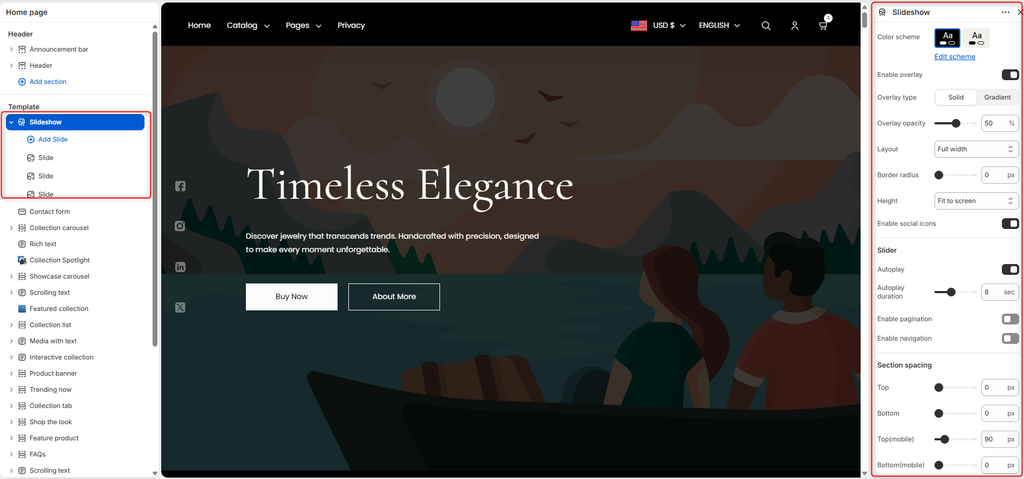
How to add a Slideshow
Steps
- In the theme editor, select Sections
- In the left sidebar, within the Template area, click “Add Section”
- Select Slideshow to add to your page
- Add Slide blocks to it and their content
- Save your changes
Configuring the Slideshow
Color Scheme
Select the color scheme used for the slideshow.
The available color schemes are configured in the theme’s global color settings.
Click Edit scheme to modify the colors associated with the selected scheme.
Enable Overlay
Enable this option to display an overlay over the slideshow.
Upon enabling the overlay, you can select your desired overlay type. Either Solid or Gradient.
- Solid: Applies a single, consistent overlay color.
- Gradient: Applies a gradient overlay across the slide.
Overlay Opacity: Controls the transparency of the overlay.
Layout
Choose how wide the slideshow should appear on the page.
- Full width: Displays the slideshow across the available width of the page.
- Boxed Width: Displays the slideshow within a constrained container rather than extending across the full width of the page.
Border Radius
Controls the roundness of the slideshow’s corners.
Height
Controls the vertical height of the slideshow. Choose from the available options:
- Medium – Displays the slideshow at a moderate height, providing a balanced amount of space for the slide content.
- Large – Displays the slideshow at a larger height for a more prominent visual presentation.
- Fit to screen – Adjusts the slideshow height to fit the available screen height.
Enable social icons
Enable this option to display your configured social media icons within the slideshow.
The social media accounts displayed are based on the links configured in the theme’s social media settings.
Slider
Autoplay
Enable this option to automatically advance through the slides.
Autoplay Duration
Set how long each slide remains visible before the slideshow moves to the next slide.
The duration is specified in seconds.
Enable Pagination
Enable this option to display pagination controls on the slideshow.
Various styles of display are available:
- Number – Displays the current slide number and the total number of slides.
- Bullets – Displays a series of dots representing the available slides.
Position: Choose where the pagination controls appear on the slideshow.
- Bottom – Left: Positions the pagination at the bottom-left of the slideshow.
- Bottom – Center: Positions the pagination at the bottom-center of the slideshow.
- Bottom – Right: Positions the pagination at the bottom-right of the slideshow.
- Vertical Center – Right: Positions the pagination vertically along the right side of the slideshow.
Enable Navigation
Enable this option to display arrow controls that allow customers to manually move between slides.
Navigation Position: Choose the position style of the navigation arrows.
- Classic: Uses the classic navigation arrow layout.
- Standard: Uses the standard navigation arrow layout.
Section Spacing
Use the Section spacing settings to control the amount of space around the slideshow.
- Top: Sets the spacing above the slideshow on desktop devices.
- Bottom: Sets the spacing below the slideshow on desktop devices.
- Top (mobile): Sets the spacing above the slideshow on mobile devices.
- Bottom (mobile): Sets the spacing below the slideshow on mobile devices.
Slide Block
The Slide block allows you to configure the content and appearance of an individual slide within the Slideshow section. Each slide can have its own image or video, text, positioning, and call-to-action buttons.
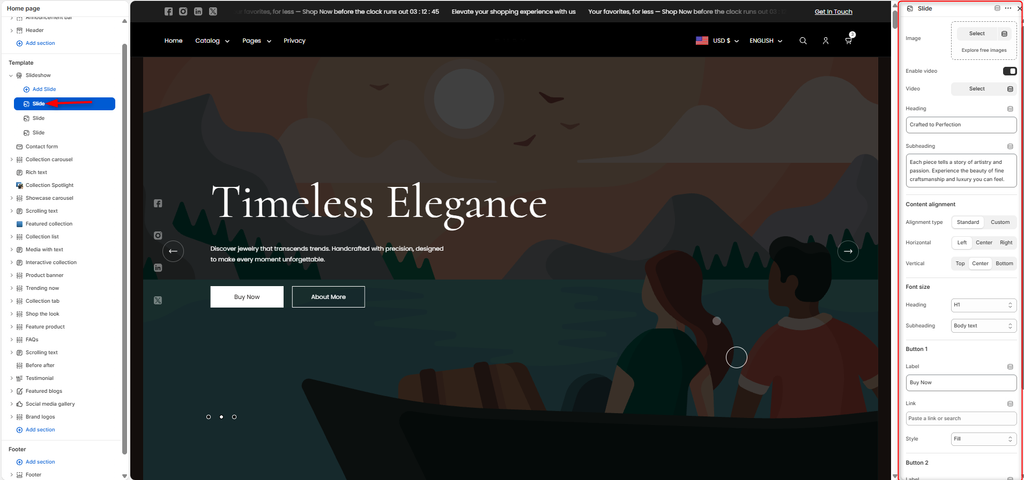
Slide Content
Each slide can be configured with:
- Image: Add a background or featured image.
- Video: Enable video and select a video to use instead of an image.
- Heading: Add the main slide heading.
- Subheading: Add supporting text.
- Content alignment: Position the slide content horizontally and vertically.
- Font size: Choose the heading and subheading text styles.
- Buttons: Add up to two call-to-action buttons, including their labels, links, and styles.